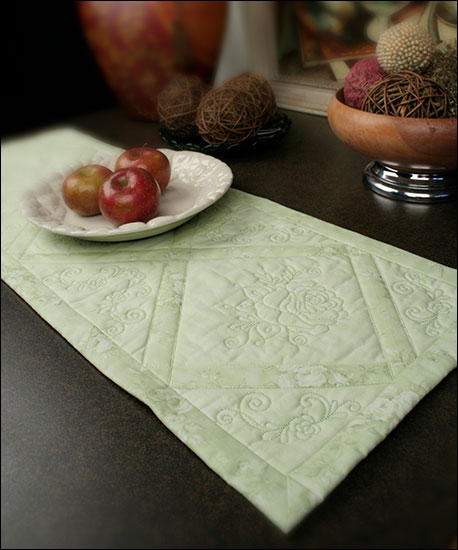
Quilted Table Runner
Create this elegant quilted table runner in any color to fit your home decor or the season. Finished size is approx. 13" x 35".
Supplies
- OESD's Quilting from the Heart #78580 embroidery design collection
- (2) 17” X 38” pieces of fabric for front and back
- (1) 17” X 38” piece of lightweight batting
- 1 7/8” wide strips of contrasting fabric for sashing. Use a 1” bias tape maker to make finished width 1”. You will need four 20” and four 12” long strips.*
- 3 1/2” wide strip of contrasting fabric for binding/border sewn together with diagonal seams. You will need approximately 3 1/4 yards.*
- Isacord thread - color(s) of your choice
- OESD AquaMesh WashAway or AquaFilm WashAway stabilizer
- Temporary Spray Adhesive
- Washaway marking pen
- Invisible sewing thread
* Strips should be cut on the crosswise or lengthwise grain. Strips cut on the bias tend to stretch.
Instructions
Embroidery:
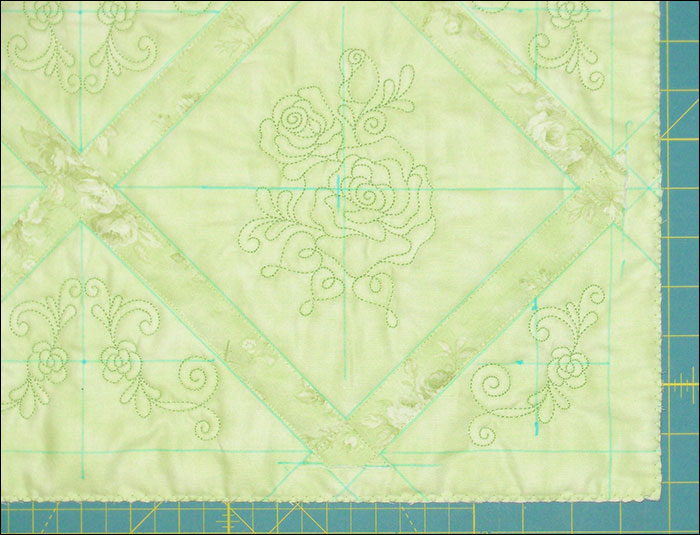
Mark horizontal and vertical center lines on 17” X 38” front fabric piece.
Cut a 6 3/4” square piece of paper, spray with temporary spray adhesive, rotate 45 degrees, and position it on fabric, making points aligned with center lines. Mark 1” wide diagonal sashing guidelines parallel with and adjacent to the paper square. Relocate the paper square to the right and left of the center diamond and draw the remaining sashing guidelines.
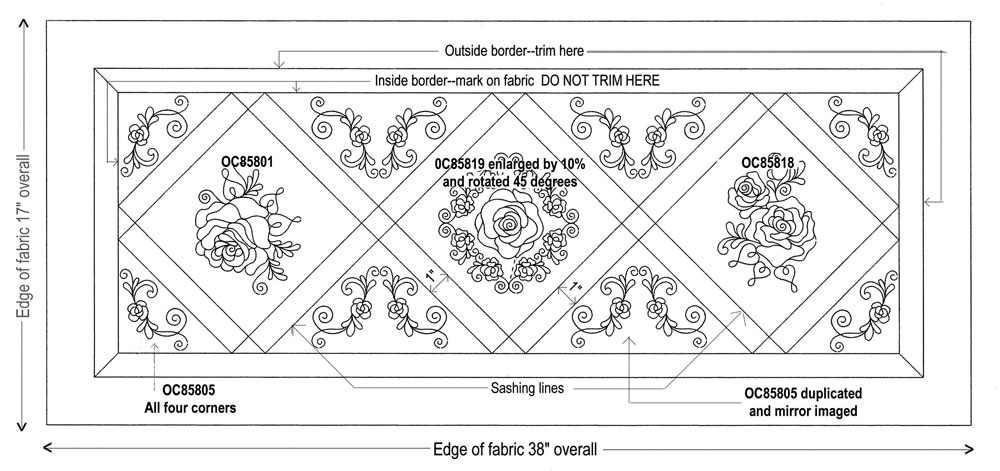
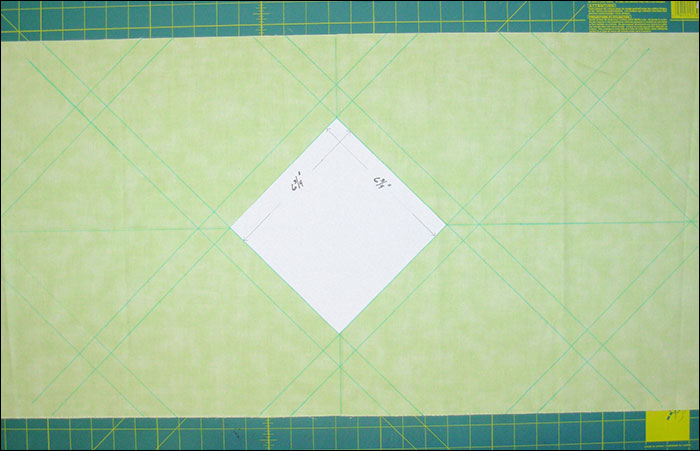
Draw a line parallel to each of the outside edges of the fabric. This line will intersect the 1” square diamonds formed by the sashing guidelines. This line is the INSIDE edge of the finished border. Do not trim the fabric yet.
Using temporary spray adhesive, adhere the WRONG sides of the front and backing fabrics to each side of the batting. If desired, use safety pins but remember to remove them prior to embroidering.
Layout each embroidery design (using a template of your choice if necessary) and mark the center lines of design on the fabric. (See the drawing for designs used)
For each embroidery design, hoop the quilt “sandwich” with a layer of either OESD AquaMesh WashAway or AquaFilm WashAway stabilizer and complete the embroidery. The stitching will be visible on the back so adjust the machine tension as necessary.
Constructing Table Runner
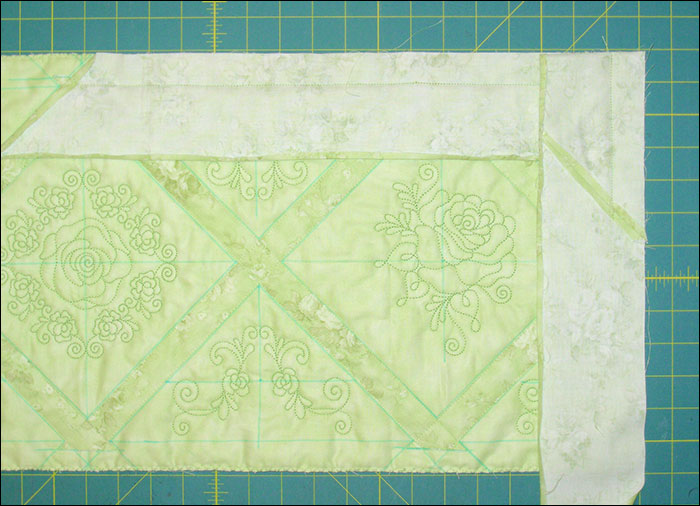
Using temporary spray adhesive, adhere the 1” strips to the diagonal sashing lines marked on the front of the piece. Pin if necessary to avoid shifting/stretching. Make sure the strips extend beyond the inside border line marked on the fabric.
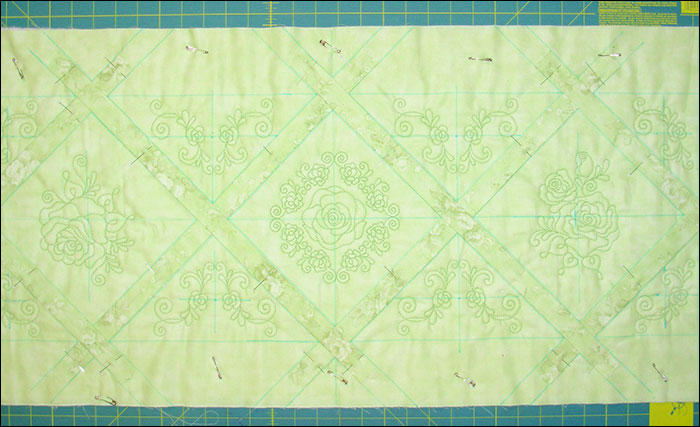
Thread your sewing machine with invisible thread in the needle and Isacord polyester thread in the bobbin. Stitch the sashing as close to the edge as possible. Start and stop stitching 1/4” beyond the inside border line. Trim off the excess unstitched sashing. The 1/4” overlap will be covered by the binding.
With a straight edge ruler and rotary cutter, trim excess fabric so that you have a 1” wide border on all four sides of the runner. Make sure your cut is 1” OUTSIDE the previously marked inside the border. Zigzag stitch the edge to stabilize the layers. (The embroidery may have caused the original line to distort slightly. Adjust as necessary to ensure that outside border is square)
Fold under and press a 1/4” hem on one long side of the 3 1/2” wide strip (binding). Trim beginning of binding diagonally. Fold this end under 1/4” and press. Layout binding before sewing to make sure no seams are located at the corners.
With right sides together, align the unhemmed edge of the binding with the outside edge of the table runner and stitch together using a 1” seam allowance. Stop stitching 1” short of the corner and backstitch. Remove fabric from under presser foot. Fold the binding back diagonally (forming the mitered corner) so that the unhemmed edge of the binding is lined up with the next edge to be stitched.

Fold binding down over the mitered corner with the fold even with the edge just stitched and the unhemmed edge even with the next edge to be stitched. Begin at the edge and continue stitching, repeating the above steps at each corner.
Overlap the beginning diagonally folded edge by 1/4” to 1/2”. Stitch through both layers and trim the excess binding.
Cut away the excess stabilizer. Turn the binding over the edge to the back and finish either by handstitching or topstitching as desired.
Rinse table runner with warm water to remove any additional stabilizer and lines drawn with the washaway marker.
Your table runner is complete!
This material is © OESD, LLC and may not be reproduced or published without permission.